We recently enhanced our API to support interactive WhatsApp messages: - You can send media and buttons to WhatsApp conversations via button template events - You can let users choose between a list of up to ten options via list template events - Bubbles are now supported as clickable buttons on Whatsapp
Introduction
Chatbots can assist your team and take over boring and repetitive tasks such as gathering contact information, allowing your operators to focus on helping customers. They can also be useful as a way to answer simple questions after hours.
Besides using the Chatbot API, you can also write your own chatbot script using the Userlike Bot Language.
This tutorial will walk you through all the details you need to know to integrate a chatbot with our API.
Chatbot setup in Userlike
We assume that you already have a chatbot (framework) up and running that you now want to connect to the Userlike chat infrastructure. We also assume that your chatbot (framework) is reachable via HTTP. All you have to do now is to create a "proxy" chatbot in our Dashboard: Think of it as your chatbot's representative (or ambassador) in the Userlike chat infrastructure.
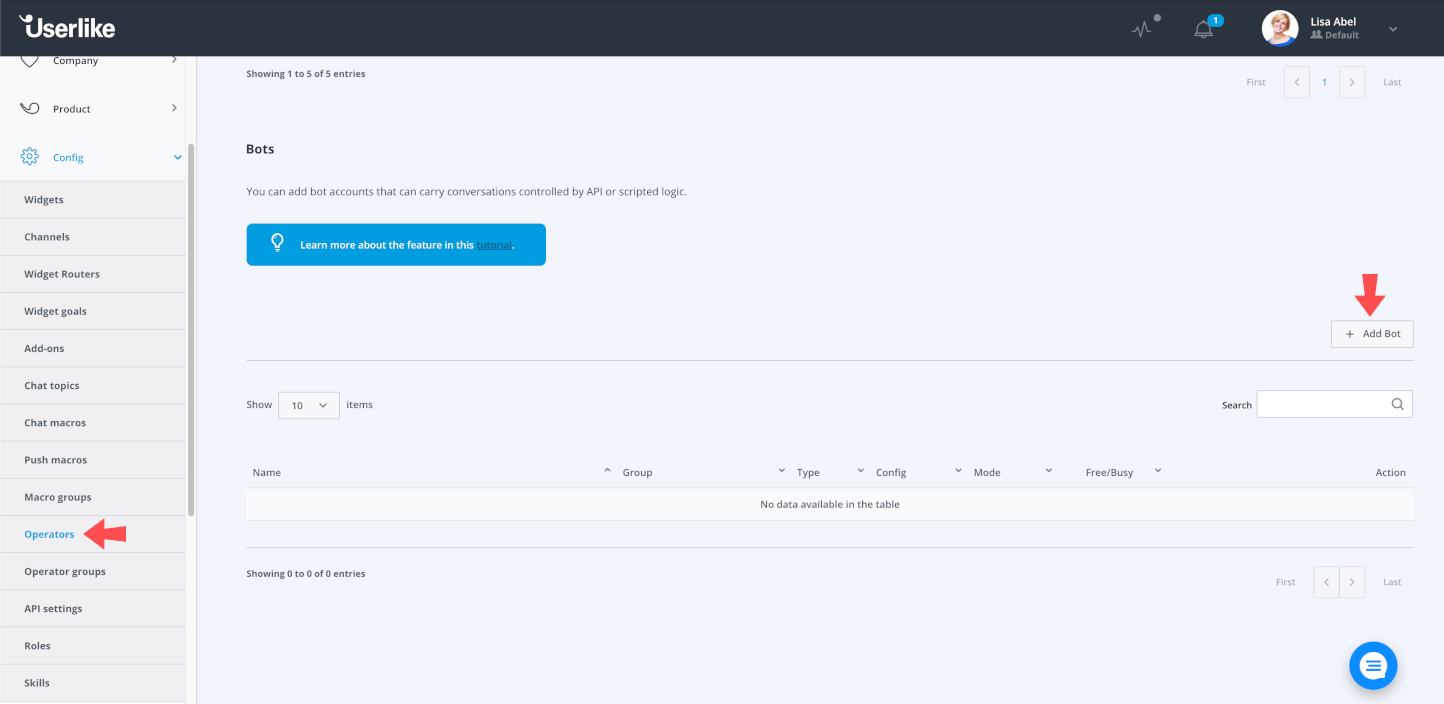
In Userlike, bots are a special type of operator. You can create a new chatbot by going to Team > Chatbots in your Dashboard. Click on Add chatbot to create a new chatbot.
Now you can configure your new chatbot:
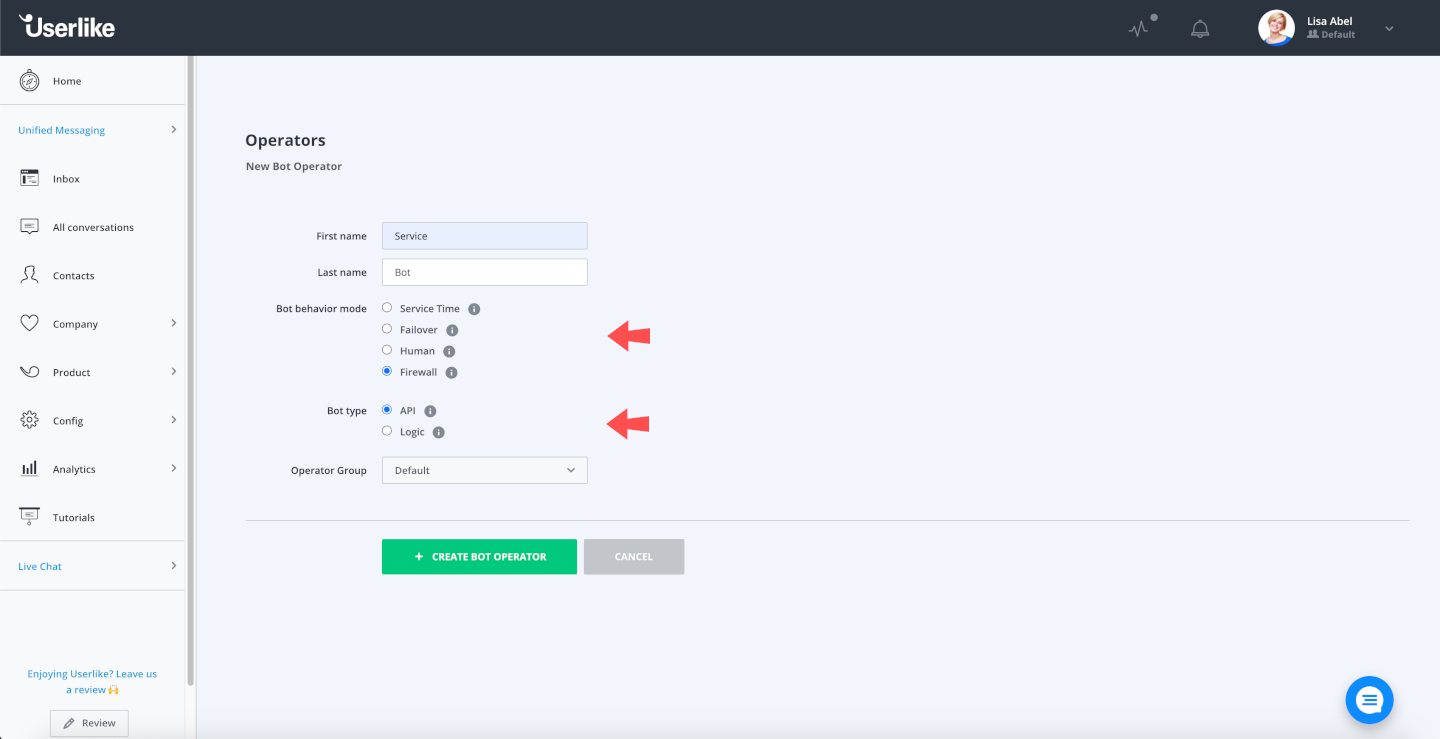
The first name, last name and operator group settings are identical to those of a regular human operator. The bot type and bot behavior modes are explained below.
Bot type
If you want to create a bot that uses our Bot API, you have to select API here. Alternatively you can implement some bot behavior with the Userlike Bot Language.
Bot behavior modes
You can configure your chatbot in four different behavior modes. These modes decide in which situations your contacts will be connected to the chatbot, or whether its human colleagues are the preferred choice.
Bot behavior mode | Description |
Service time | The bot is online only outside of the service time defined on the Widget. During service time, all chats go to your human operators. |
Backup | The bot is always online but only takes chats when no other operators are available. |
Human | The bot is always online and takes chats exactly like a normal human operator. |
Firewall | The bot is always online and receives all conversations (e.g. to categorize and forward them). |
After you have configured and saved your new chatbot, it appears in the bot overview, just beneath the human operator table.

From here you can edit it just like any other operator. After you've just added the bot, you need to edit it one time to configure the API settings.

If you edit an existing chatbot, you can additionally configure its API settings, change its profile picture and define how many concurrent chat slots your bot can handle.
Bot conversation timeout
Define a time with no reply from both contact and bot after which the conversation is considered inactive. Once this happens, the bot can perform one of the following actions:
- End conversation and move it to All conversations.
- Unassign conversation and move it to the Inbox, where any operator in your group can see and answer it.
- Forward conversation to an available human operator from the same group.
Note that bot conversations don’t show up in your Inbox as long as they’re active. Your operators will only be able to see them once they end, are unassigned or forwarded.
Webhook URL
This is a URL hosted by you, where we can reach your chatbot via HTTP. We will call this endpoint every time a chat-related event happens, e.g. when a conversation starts or when a new message comes in.
API URL
This is a unique URL hosted by Userlike, which your chatbot can reach via HTTP. You can call this endpoint any time your chatbot wants to add something to the conversation that is not a direct response to a previous request made to your webhook.
Webhook URL VS. API URL
So your chatbot has two possibilities to send messages to a conversation:
- as a direct response to a chat event that has been sent to your Webhook URL.
- as a self-initiated message to your Userlike API URL.
In most cases you will just send a response to our calls to your webhook. But when a call makes your chatbot do something that can take a while (like asking another web service), you can acknowledge the request via a response first, and then send the final result to the conversation once it is done.
API security token
You need to generate a security token to use our API endpoint and add it here. Each API call you make needs the token specified as "SECURITY-TOKEN" HTTP Header Field.
Webhook headers
You can specify HTTP Headers that will be included with each webhook request we send to you. You can use this to make sure the requests really originate from us.
Example chatbot flow
Lets say you have a webshop and want to automatically handle some of your customers' requests.
Contact starts a chat
After the bot is set up, you will receive a call to your webhook URL whenever a contact starts a chat with the bot.
See request data
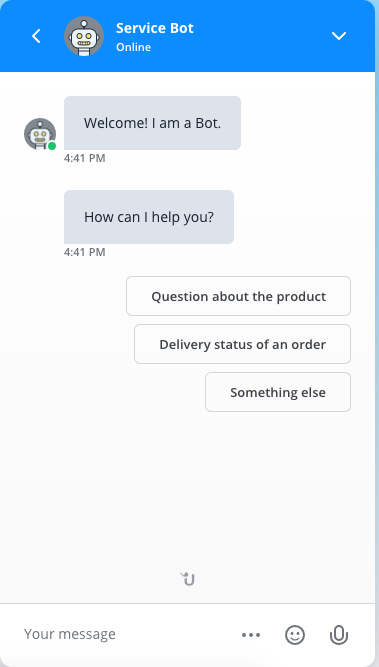
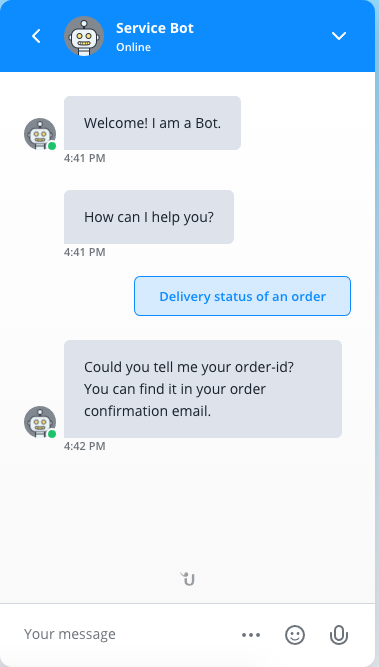
Your bot responds to the webhook request directly and sends a welcome text message, together with a bubbles element to offer the contact some choices:
See response data
This is how it will look for the contact:
Contact selects delivery status
Once the contact clicks on "Delivery status of an order", you will receive a call to your webhook URL, containing all data from the click event.
See request data
Your bot responds by asking the contact for the order ID.
See response data
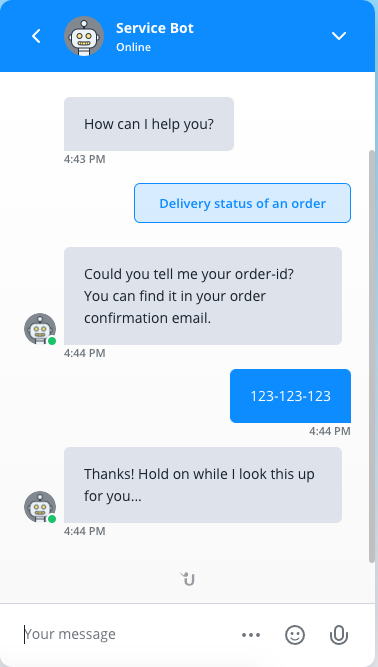
Contact sends order ID
When the contact sends the order ID, you receive another call to your webhook URL.
See request data
Since looking up all the delivery information on the order can take a while and requires a call to another webservice, your bot schedules an asynchronous job for it. To inform the contact and not keep them waiting, the bot also sends a short info message as a direct reponse to the webhook call.
See response data
Chatbot sends result
After the asynchronous job has finished, the bot makes a self-initiated call to the Userlike "API URL", sending the result of the delivery inquiry.
See cURL example
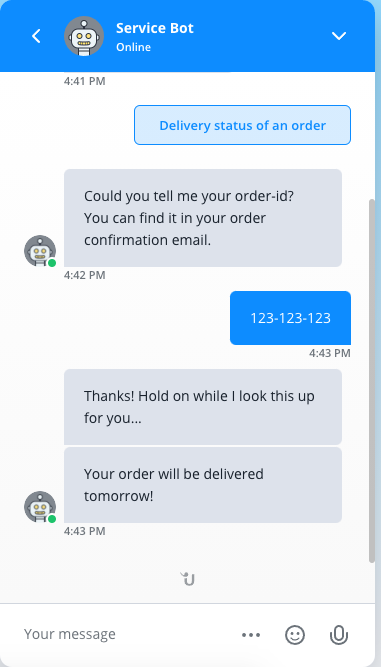
Your chatbot handled your customer's request automatically, responding to all messages immediately and delivering time-consuming results once they were done.
API Overview
Whenever a contact starts a chat and your bot is selected as a conversation partner, you‘ll receive a webhook call with a
startevent. From then on you will have the cid of the chatbot session, which can in turn be used to trigger events.When the contact writes more messages in the conversation, you will also receive more webhook calls. They will contain the same
cid as the start event has.To react to incoming events, you can trigger various events yourself. For example you can send a message or forward the conversation to a human. Those events have a similar JSON structure as the incoming ones. To trigger them you can either directly respond to the webhook call, or you can send a request to our chatbot endpoint.
Authentication and security
We offer to specify HTTP headers when you create or edit your bot in the Dashboard (see Webhook headers), which will be sent with each webhook call. We recommend that you generate a security token and use it in the headers, so you can verify that the webhook calls really originate from us.
To authenticate on our chatbot API endpoint, you have to generate another security token, which you can also enter when you create or edit a bot in the Dashboard (see API security token).
Rate limits
If you use our API endpoint, please note that you can only send 20 requests per minute that use the same
cid. When the limit is reached, we will respond with 429 status code.Versioning
Currently we only offer one version of our chatbot API:
/v1/Endpoint URLs without version scheme will always default to the latest version.
Our APIs are constantly evolving, but we are striving to implement any new features in a backwards compatible way. If breaking changes are necessary, we will introduce a new API version. Examples for breaking changes are:
- Removing, renaming, or moving API entities.
- Changing or removing functionality.
- Making optional parameters or properties mandatory.
Non-breaking changes, like new endpoints or new optional properties, can happen anytime.When we deprecate older versions of the API, we will provide at least 90 days of notice.
Webhook protocol
Whenever certain events happen, you'll receive a POST Request on your webhook, which contains JSON data describing the event.
The event data looks like this. Note that the contact and widget objects were left out to keep the sample shorter. You can find the full object below.
javascript{
    "info": {
        "approach_mode": "proactive",
        "cid": "chatbot::258:a56785fb6fb84edd890905913b0c0821",
        "contact": {},
        "context": {},
        "conversation": {},
        "widget": {}
    },
    "packet": {
        "name": "start",
        "payload": {}
    }
}
The
info object contains general information about the chatbot session, while the packet object contains event-specific information.Info object
These are the keys of the
info object:Key:
cidType:
StringDescription:
Unique string identifier for the current chatbot session. You will need to include this, if you want to trigger an event in response to the webhook call.
Key:
contactType:
ObjectDescription:
Information on the contact. If the contact is visiting your site for the first time, this will not contain much. But otherwise this might contain useful information.
Example
Key:
contextType:
ObjectDescription:
You can use the context object to save state for a specific bot session. You can read more about this here: How to use our API to keep state
Key:
conversationType:
ObjectDescription:
Information about the current conversation, e.g. conversation URL, topic or channel.
Example
Key:
approach_modeType:
StringDescription:
he approach mode that was used to start the conversation. It is set to
"proactive" if the messenger opened automatically, otherwise it is set to "normal".Key:
widgetType:
ObjectDescription:
Information on the widget that was used to start the conversation.
Example
Webhook events
Those events can be inside the
packet object when your webhook is called:Name:
startDescription:
A new chat session with a bot was started.
You should use this event to send a welcome message to the contact.
Payload parameters
Example
Name:
messageDescription:
A new message from the contact was received.
Payload Parameters
Example
Name:
mediaDescription:
A new file upload from the contact was received.
Payload parameters
Example
Name:
clickDescription:
A contact clicked on an option of a bubble or carousel element.
Payload parameters
Example
Name:
forward_failedDescription:
A forward operation triggered by your bot failed because no operator was available. This is only sent if the
forward_group or forward_any event that your bot sent contained an on_failure key set to feedback, otherwise the conversation is automatically unassigned and the webhook stops receiving updates. This event has no payload parameters.Example
Name:
locationDescription:
This is only relevant for WhatsApp. They have a special message that allows users to send a location. If what happens you will get an event of this type.
How to respond
We expect you to respond with a 200 status code. You can either leave the response body empty or use the response to directly trigger some events.
Triggerable events
To respond to the events sent to the webhook, you can trigger certain events yourself.
This is what an event looks like:
javascript{
    "info": {
        "cid": "chatbot::258:a56785fb6fb84edd890905913b0c0821"
    },
    "packet": {
        "name": "message",
        "payload": {
            "body": "Welcome!"
        }
    }
}
It always needs a
cid specified inside the info. packet also always needs an event name. The payload differs for each type of event. In this case we have to provide the content of the message under body.Events can be triggered by two in two ways:
- You can include a list of event objects as JSON in your response to our webhook call.
- You can also send the same JSON as a new request to our API endpoint.
Example
Those actions are available:
Name:
messageDescription:
Send a message to the contact. You can use up to 5,000 characters.
Payload parameters
Example
Name:
bubblesDescription:
Send a message to the contact, together with different buttons to click on. You'll receive a click event when the contact clicks on one of the buttons. This works for conversations that started on a website via our chat widget and partially works for WhatsApp and Facebook, but for those we recommend using
list_template or button_template.
If a bubbles message is sent to a contact coming from WhatsApp or Facebook, we automatically try to convert it to an interactive message. For WhatsApp we convert when there ten or less options and each option label has 20 or less characters. Facebook also only allows up to 20 characters in option labels, but they allow up to 13 options. If the bubbles message exceeds the limits, or if the contact wrote via another messaging app, we convert the bubbles to text using the "fallback" parameter.Payload parameters
Example
Name:
carouselDescription:
Similarly to bubbles, but with images on the buttons. You'll receive a click event as a response.
Payload parameters
Example
Name:
button_templateDescription:
Button template messages are made specifically for certain messaging-apps. Currently supported messaging-apps are:
- WhatsApp
- Facebook Messenger
They consist of:
- An optional header. For Facebook only images are supported. Whatsapp supports text, an image, a video or a document.
- A message body shown below the header
- An optional footer
- Up to three buttons. When the user clicks them, you will receive a click event.
If a button template message is sent to a web-conversation, only the
body and the options are shown. For not supported messaging apps we currently show a text version.Parameters
Example Whatsapp
Example Facebook
Name:
list_templateDescription:
List template messages are made specifically for WhatsApp. They consist of a message with:
- An optional headline text
- A message body shown below the headline
- A button prompting the user to open a selection screen
- A footer shown at the bottom of the message The selection screen has:
- A headline shown above the options
- A list of up to ten options, each has a label and can have an optional description
- A submit button with the same text as the button prompting the select If a list template message is sent to a non-WhatsApp channel it will still work, but some non-essential parts of the message will be lost.
Payload parameters
Example
Name:
button (deprecated)Description:
Displays a clickable button that opens the provided URL. Note that you will not receive any feedback if the button is clicked. This event is deprecated and will be removed with a future version of the Chatbot API. Please use the
buttons event instead.Payload parameters
Example
Name:
buttonsDescription:
Displays multiple clickable buttons that open provided URLs. Note that you will not receive any feedback if the button is clicked.
Payload parameters
Example
Name:
mediaDescription:
Send a message containing an image, video or audio file. Please note that the media pointed to by the URL in
link must stay reachable from our servers until the request is completely processed. If our systems fail to download your file (due to network outages, for example), you will receive an error response and should take appropriate measures to resolve the situation, e.g. by retrying.Payload parameters
Example
Name:
navigateDescription:
Make the contact navigate to a certain URL.
Payload parameters
Example
Name:
contact_updateDescription:
Update the contact‘s name, email and mobile number. You only need to provide one of
name, email, mobile_number or external_customer_id. Payload parameters
Example
Name:
abortDescription:
Stop bot interaction and continue normal conversation flow. The conversation is visible for and can be routed to human operators. This event has no payload parameters.
Example
Name:
endDescription:
Terminate the bot session and set the 'ended' status on the conversation. This event has no payload parameters.
Example
Name:
forward_groupDescription:
Terminate the bot session and forward the conversation to any available operator from the given group.
Payload parameters
Example
Name:
forward_skillsDescription:
Terminate the bot session and forward the conversation to any available operator who has all of the given skills.
Payload parameters
Example
Name:
forward_anyDescription:
Terminate the bot session and forward the conversation to any available operator in the same group.
Payload parameters
Example
Name:
delayDescription:
Delay messages by a specified amount of time. During the delay, contacts will be presented with a typing indicator by default.Delays only affect subsequent messages in the same response/request, so sending a delay only really makes sense when sent in a list of actions.Note that a delay doesn’t prevent contacts from sending a message.
Payload parameters
Example 1
Example 2
Name:
note_createDescription:
Create notes during the current conversation. This event can create notes referring to the contact or the conversation. If you set the
contact_identity_id in the packet’s payload, a note for the contact will be created, otherwise the note will be created for the conversation. Payload parameters
Example 1
Example 2
Keeping state with the context object
We allow you to keep session-specific state in our API.
On each webhook response or API request, you can provide a
context, which can be any valid JSON object. Just make sure it’s not bigger than 10 KB.After you set a context, we will echo the same object in each webhook request we send to you. Note that we will completely overwrite the previous context object, if you provide a new one. If you send us an empty context, we will ignore it and keep the previous one.
Chatbot sessions
Chatbot sessions are started when a conversation is started on your widget, while a bot is configured with a matching behavior mode.
After the session starts, it stays open for a defined timeout without messages or other chat activity. The timeout can be configured in the widget settings under 'Live conversation timeout'.
Right now there is no way to resume an expired session.
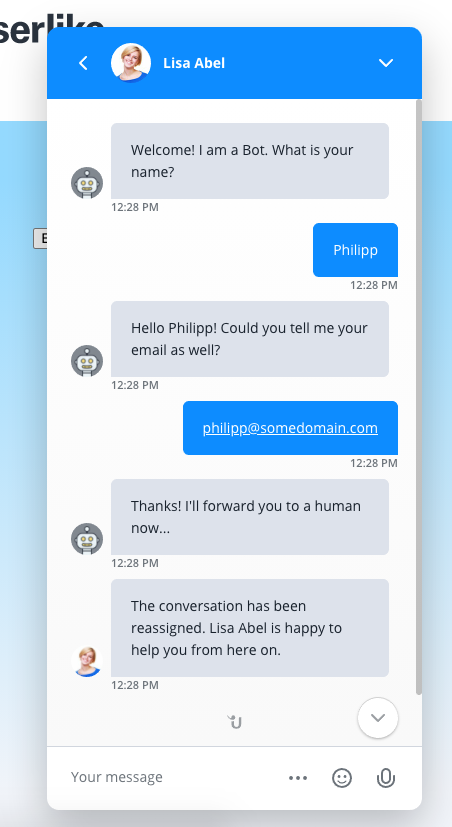
Python server example
We prepared a Python sample server for a bot that asks for the contacts name and email, before forwarding him to a human.
javascriptimport threading
import json
import socketserver
from http.server import SimpleHTTPRequestHandler


HOST = "localhost"
PORT = 8000
OUTBOUND_AUTH_TOKEN = "d8facdb0-7510-495c-9d6e-8c22b9260e7a"


def create_event(cid, context, packet_name, payload):
    return {
        "info": {"cid": cid, "context": context},
        "packet": {"name": packet_name, "payload": payload},
    }


def create_message(cid, context, body):
    return create_event(cid, context, "message", {"body": body})


def create_contact_update(cid, context, **kwargs):
    return create_event(cid, context, "contact_update", kwargs)


def create_forward_any(cid, context):
    return create_event(cid, context, "forward_any", {})


class InboundSimpleHTTPRequestHandler(SimpleHTTPRequestHandler):
    def handle_start(self, message):
        """Welcome contact and ask for name"""
        body = "Welcome! I am a Bot. What is your name?"
        self.wfile.write(
            json.dumps(create_message(message["info"]["cid"], {"state": "name"}, body))
        )

    def handle_name(self, message):
        """Save the name and ask for email"""
        contact_name = message["packet"]["payload"]["body"]
        contact_update = create_contact_update(
            message["info"]["cid"], {}, name=contact_name
        )
        body = "Hello %s! Could you tell me your email as well?" % contact_name
        chat_message = create_message(message["info"]["cid"], {"state": "email"}, body)
        self.wfile.write(json.dumps([contact_update, chat_message]))

    def handle_email(self, message):
        """Save email, thank contact and forward to human"""
        contact_email = message["packet"]["payload"]["body"]
        contact_update = create_contact_update(
            message["info"]["cid"], {}, email=contact_email
        )
        body = "Thanks! I'll forward you to a human now..."
        chat_message = create_message(message["info"]["cid"], {}, body)
        forward = create_forward_any(message["info"]["cid"], {})
        self.wfile.write(json.dumps([contact_update, chat_message, forward]))

    def do_POST(self):
        content_length = int(self.headers["Content-Length"])
        token = self.headers.get("API-SECURITY-TOKEN")
        if token != OUTBOUND_AUTH_TOKEN:
            self.send_response(401)
            self.end_headers()
            self.wfile.write("Unauthorized")
            return
        self.send_response(200)
        self.send_header("Content-type", "application/json")
        self.end_headers()

        body = self.rfile.read(content_length)
        message = json.loads(body)
        packet_name = message["packet"]["name"]
        contact_name = message["info"]["contact"]["name"]
        contact_email = message["info"]["contact"]["email"]

        # If the name or email is set already, the contact is returning.
        # In that case we don't want any bot behaviour:
        if packet_name == "start" and (contact_name or contact_email):
            self.wfile.write(json.dumps(create_forward_any(message["info"]["cid"], {})))
        elif packet_name == "start":
            self.handle_start(message)
        elif packet_name == "message" and message["info"]["context"]["state"] == "name":
            self.handle_name(message)
        elif (
            packet_name == "message" and message["info"]["context"]["state"] == "email"
        ):
            self.handle_email(message)


class ThreadedHTTPServer(object):
    def __init__(self, host, port, request_handler=SimpleHTTPRequestHandler):
        socketserver.TCPServer.allow_reuse_address = True
        self.server = socketserver.TCPServer((host, port), request_handler)
        self.server_thread = threading.Thread(target=self.server.serve_forever)
        self.server_thread.daemon = True

    def start(self):
        self.server_thread.start()

    def stop(self):
        self.server.shutdown()
        self.server.server_close()

    def serve_forever(self):
        self.server.serve_forever()


if __name__ == "__main__":
    handler = InboundSimpleHTTPRequestHandler
    server = ThreadedHTTPServer(HOST, PORT, request_handler=handler)
    try:
        server.serve_forever()
    except KeyboardInterrupt:
        server.stop()
This is how the bot interaction looks for a contact: