
The Website Messenger represents the Userlike chat from a customers perspective.
Before the chat
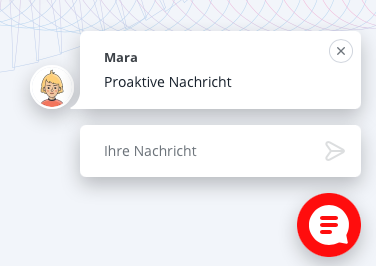
Proactive mode
You will see a proactive message above the chat button which will invite you to start a chat. You can do so by using the text input field underneath the proactive message. Registration mode is disabled when doing so.
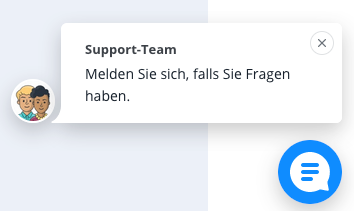
Welcome bubble
The welcome bubble is just like the proactive text and will also appear above the chat bubble, but you can’t start a chat right there. You have to click on the chat bubble to do so. Use this if you want the registration to be mandatory, but want a prominent welcome bubble as well.
Button profiles can be edited in the Widget Editor
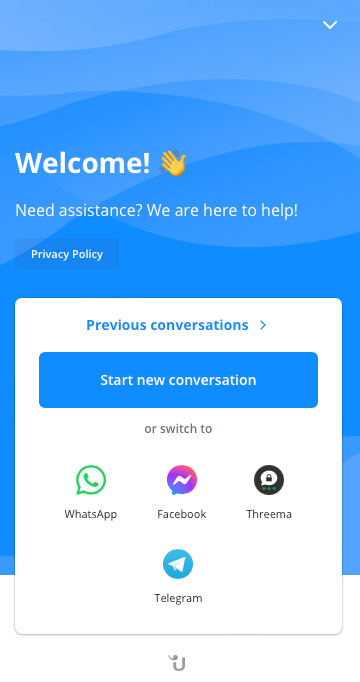
Messenger Board
You can start a new conversation or go back to an old one in the Messenger Board. It will also show the privacy policy link. The Messenger Board will appear before the chat if it is activated, but you can also see it while being in a chat and using the arrow in the upper left corner.
Privacy Policy
If you click on privacy policy in the Messenger Board it will open an external link. You will also see a privacy policy note before the chat starts which you have to accept for the chat to start.
Group select
If active, you will see the group select after the privacy policy note. Pick the topic you want to talk about and you will be forwarded to the operator group in charge.
Registration mode
When the registration mode is activated the contact has to leave name and email address to start a chat. The registration can be set to optional, meaning the contact can (but not has to) type in his data to start the chat. Additional fields (like phone number, customer ID and others) can be set and marked as required. This can be set differently for online and offline mode.
Conversation
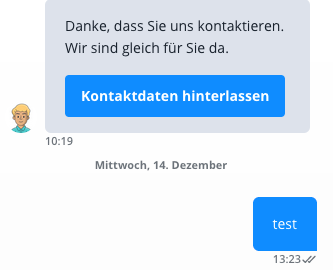
The conversation will start with a greeting (proactive above the chat bubble or directly in the chat when online and set) or with the offline message. You’ll see the small Powered by Userlike “U” at the bottom of the chat window above the input box if you didn’t deactivate the logo (available from Flex plan). In the upper area, you have the option to either minimize the chat or go back to the Messenger Board.
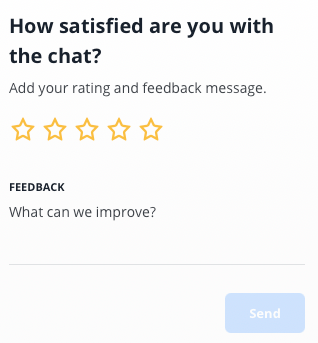
Feedback & Rating
When the operator marks the chat as ended, the contact will see the survey. After they click on something, the star rating with the text field will appear. The survey before the conversation will appear similar to the group select.A “rate conversation” banner will appear in the upper area of the chat after two messages were sent by the operator. This happens automatically and can’t be configured.
During the chat
Next to the input field, you’ll find these options under “...”:
- Receive transcript: This will open another tab within the chat where you can enter your mail address to receive the chat transcript.
- Rate conversation: This will open another tab within the chat where you can rate the conversation with one to five stars and leave feedback in text form. This option is only available if the operator sent at least one message in the conversation.
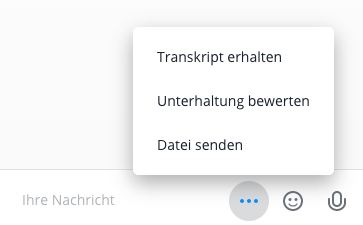
- Send file: This will open a box above the text input field in which you can drag & drop your file or browse for it.
“Message delivered/read checkmarks”
You can check if your message was delivered (one checkmark) or read (two checkmarks).
Please note that if that might not be accurate if the other side has disabled this feature.
Emoji
The emoji section will open a new box above the input field and show the available emojis. You can pick your skin type next to the search bar.
Voice Message
The voice message section will open a new box above the text input field where you can “tab to start recording”. When you start a recording you have the option to cancel or stop it. When you stop it, you can hear what you just recorded and have the option to cancel or send it.
Audio & Video Call
Just an operator can start an audio or video call, so you won’t see an option for that in the customer view. When the contact receives a call invitation and accepts it, a new tab will be opened. The call won’t start immediately. Contact sees the call preparation first where he can choose video and audio input. He can also disable camera and audio here. If the contact clicks on “Join call”, the call will start. He can still disable or enable the camera here, share your screen or end the call.
Find a list of IP ranges and protocols that need to be whitelisted:
https://www.twilio.com/docs/video/ip-addresses
End of Conversation
When an operator ends the conversation, you’ll see this text “Operator has marked the conversation as finished. It can be resumed by writing a new message.” and the five star rating and text feedback field if set.